
Updated on June 21, 2023
Here are the instructions to set up your campus/concurrent licenses. This will allow you to provide licenses to your users and also to manage these licenses. Please go through the following steps to complete the setting up process.
NOTE: The license server will use TCP port 15500. Make sure that your client and server firewalls allow TCP connections to this port.
1. Download the license server setup file.
- LINUX server setups files:
2. Install the rpm package by typing in the console root:
# rpm -i mestrelablicserver-2.2.0-18488.i386.rpm
3. Installation details: MLicServer will be installed in:
/opt/mestrelablicserver/lib/mlicadmin
A service called mestrelablicserver will be installed in /etc/init.d. Before installation, to start the service from a console you can type:
# /etc/init.d/mestrelablicserver start
and to stop the service:
# /etc/init.d/mestrelablicserver stop
To check if the daemon is running you can type:
# /etc/init.d/mestrelablicserver status
By default the service will start in the runlevels 2, 3, 4 and 5, this can be modified removing the links in the /etc/rc*.d directories or using chkconfig.
Please note that the new MlicServer version 2.2.0, by default, only allows MLicAdmin connection to ‘localhost’. If you need to use MLicAdmin from any other machine than the local machine –where the server is running– then you must allow it from the MLicAdmin. So for the first time, the MLicAdmin must be run in the same computer where the server is running and the server name must be ‘localhost’ or the IP address ‘127.0.0.1’.
4. Run now MlicAdmin. You can find it in the menu Applications/System.
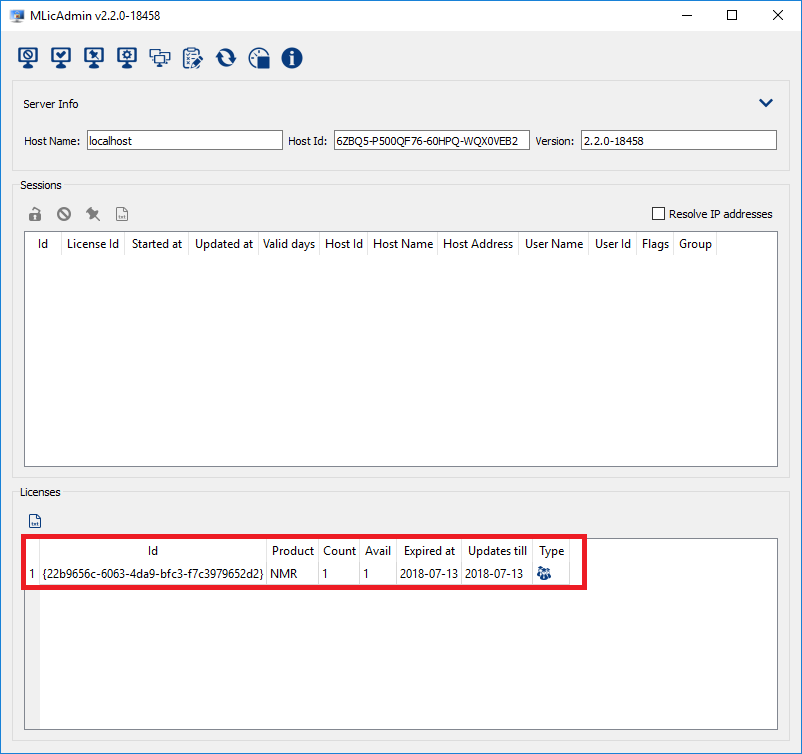
5. Copy the 'Host ID'MLicAdmin dialog box and send it to us by email to support@mestrelab.com)

6.We will write back to you with a license file, which you must save in:
/opt/mestrelablicserver/lib/licenses
(If you have renewed the Update&Support package, please make sure that you remove the old license file)
7. Restart the server on a terminal (see point 3 for further information about it).
8. Now if you run again MLicAdmin you will see an item in the Licenses table. If no item shows, it means that either the license file was not correctly installed or the license file is invalid.
9. You must provide your users a copy of the license file that Mestrelab provided you before. But first, you must edit the license file to add the server hostname or IP address information to allow your users to validate against your server. For example, if you receive the following license file (The license file is a XML file with .lic extension, that you can open with any text editor):
<mlic version="1.0"> <licid>{b62b493d-9e6d-40f0-a0e6-c728c46fc3b2}</licid> <type>floating</type> <hostid>7S7YJ-67R8WBEX-ZE5VW-FXCXVVME</hostid> <vendor>Mestrelab Research S.L.</vendor> <purchaser>John Doe</purchaser> <product>NMR</product> <version>1.0</version> <uuid>{5b0a2812-8ee2-406f-8030-84f5f6ac4a4b}</uuid> <count>2</count> <issued>2007-05-24</issued> <expires>never</expires> <update>2008-05-24</update> <sign>Lk8NmBTei5ewmCzGYEAg</sign> </mlic>
Using your preferred text editor, you must add the following line between the mlic opening tag (<mlic>) and the closing one (</mlic>):
<server>SERVER_NAME</server>
If you have problems or are not confident with this process, just write to us with the IP address for the server and we will include them in the license file before sending it back to you. Changing SERVER_NAME by either your server hostname or your server IP address in dot notation (bear in mind that if the server´s IP address is dynamic, you must use the server hostname instead of the IP address in dot notation). So, using the previous sample, you will get the next file after editing:
<mlic version="1.0"> <licid>{b62b493d-9e6d-40f0-a0e6-c728c46fc3b2}</licid> <type>floating</type> <hostid>7S7YJ-67R8WBEX-ZE5VW-FXCXVVME</hostid> <vendor>Mestrelab Research S.L.</vendor> <purchaser>John Doe</purchaser> <product>NMR</product> <version>1.0</version> <uuid>{5b0a2812-8ee2-406f-8030-84f5f6ac4a4b}</uuid> <count>2</count> <issued>2007-05-24</issued> <expires>never</expires> <update>2008-05-24</update> <sign>Lk8NmBTei5ewmCzGYEAg</sign> <server>192.168.2.5</server> </mlic>
10. You can now circulate an email to your users asking them to download Mnova.
11. In this step there are two options: The first one will be to save the license file you have edited following the instructions (in the step number 9) in a shared folder. We strongly recommend this option, because in the future you will not need to worry about sending new license files each year when you renew the Update&Support package of our products. Just go through the following steps:
- Define a path accessible by all the Mnova users in the server computer.
- Copy all the license files that you want to share with your clients to the path.
- For windows users: Create a .reg file with the following information:
Windows Registry Editor Version 5.00 [HKEY_CURRENT_USER\Software\Mestrelab Research S.L.\MestReNova\License] "SharedRepository"="//path/to/shared/folder"
If you need to activate licenses for Mnova Lite, the .reg file must contain this line (instead):
[HKEY_CURRENT_USER\Software\Mestrelab Research S.L.\MestReNova LITE\License]
Send this .reg file to the clients. The clients will only need to double click on it in order to import the registry configuration. Of course, it will be possible to do that by batch scripting.
For Mac users: They will have to edit the property_list file which file is located at:
~/Library/Preferences/com.mestrelab.MestReNova.plist
They can use any preferences editor to do it. Basically, they will need to add a new item with the name License.SharedRepository and the corresponding path of the license.
For example, using the Terminal app (in /Applications/Utilitites/Terminal.app) you could set the setting using the following command:
defaults write com.mestrelab.MestReNova License.SharedRepository /path/to/licenses/shared/repository
changing /path/to/licenses/shared/repository with the path where the licenses shared repository is from your system.
To check the current value you can type instead:
defaults read com.mestrelab.MestReNova License.SharedRepository
and to delete the key if you don't want to use it anymore:
defaults delete com.mestrelab.MestReNova License.SharedRepository
They can use for example this editor: http://www.apple.com/downloads/macosx/system_disk_utilities/prefedit.html
For Linux users, they will need to edit the following text file:
.config/Mestrelab Research S.L./Mestrenova.conf
Search for the [License] section inside the file and add the following line to that section (If the section doesn't exist, add the section just typing [License]).
SharedRepository = path
An alternative option (not recommended*) is to circulate an email to your users attaching the license file you have edited following the instructions in the previous step and go through the steps 12 and 13.
*(Please note that this option would work just fine but we do not recommend it due to the fact that it will require a distribution of the license files for activation to all client computers each time you purchase a new Update and Support package)
12. Instruct them to save it on disk and, once they have run Mnova, go to ‘Help/Get-Install' menu and click on 'Install' button ('Help/Evaluate-Buy’ and click on ‘Activate’ if you are using Mnova v8.0.0 or older) then navigate to the license file and double click on it.
13. The application will be activated and your users should now have access to the software.
Once you are all set please follow this link with instructions to manage campus or floating licenses with MlicAdmin
